Intallation and configure wifi Router with PTCL DSL modem
Required Cpmponent
- Computer
- PTCL DSL Modem
- Phone Line
- Ethernet Cable
- Model power cable
- Phone Line Jack
I am going to use a TP-Link router here for writing these steps but these are generic so these steps can be used to configure any router with
your PTCL modem. We would also change the IP address for the router and disable router from getting an IP automatically which in other words
mean disabling DHCP on the router.


1.Plug in your routers power cable and turn it on.


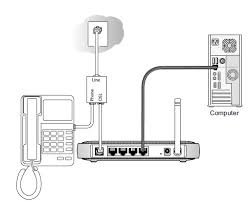
2.Now that your router is turned on you need to connect this router to your computer using an Ethernet cable. Please connect using the LAN port.

3.Your computer will establish a connection with the router automatically as DHCP is enabled on the router by default.
Open Firefox or whatever browser you use for surfing websites and type in the routers default IP address in the address bar which in our case is http://192.168.1.1 as we are using a TP link router. Please find out what the default IP is for your router from the user manual if you are using a different brand.

5. You would see a log in prompt and your default id and pass word are both "admin" without the quotes. Once you hit enter after entering admin in both the fields you would see the admin console on your browser.

6. Go to the LAN option listed under Network and change the IP address to 192.168.1.2 and save. The reason we are doing this is because your PTCL modems IP address is 192.168.1.1 and we don't want a conflict resulting into a mess. Once you save the new IP address your router will automatically reboot.

7. Once your router is restarted you need to open the admin console again but this time you would need to use the new IP address that we have changed it to which is http://192.168.1.2 and again enter the same user name and password which is "admin" and you will see the admin console again.

8. Go t the option that says Wireless Settings and you would see the SSID field. Please change it to something more individual because that's the name you would see when you are looking for your WiFi network and please don't use any rude words as this can be seen by every one who lives near by :) Use some thing like "My home network" or something on those lines.


9. Change the country to Pakistan or where ever you live and rest of the settings can be left to whatever the default is.


10. Now go to the Wireless security option to make sure no unauthorized people are able to access your WiFi network. Choose wpa-psk option as it is reasonably secured unless some hacking top shot lives near by you are pretty safe using this option. You can choose the encryption option TKIP or AES.

11.Enter the PSK pass phrase that you can remember and try using alphabets and numbers to make sure people are not able to guess it. It is generally safer to choose a non dictionary set of alphabets that make no sense.

12. Go to DHCP option and click on disable.


13. Your Router is ready to use, now just plug the Ethernet with modem.


14. Save everything and now go to Tools and click on reboot. This will restart your modem using the new settings that we have saved in all the above stept.

15. Your router is now all set and all you need to do is connect the router with the modem using an Ethernet cable. You can now take out the cable that connects to router with your computer and use the wifi network that we have created to use the internet.
 1.Plug in your routers power cable and turn it on.
 2.Now that your router is turned on you need to connect this router to your computer using an Ethernet cable. Please connect using the LAN port.
 3.Your computer will establish a connection with the router automatically as DHCP is enabled on the router by default.
Open Firefox or whatever browser you use for surfing websites and type in the routers default IP address in the address bar which in our case is http://192.168.1.1 as we are using a TP link router. Please find out what the default IP is for your router from the user manual if you are using a different brand.
5. You would see a log in prompt and your default id and pass word are both "admin" without the quotes. Once you hit enter after entering admin in both the fields you would see the admin console on your browser.
6. Go to the LAN option listed under Network and change the IP address to 192.168.1.2 and save. The reason we are doing this is because your PTCL modems IP address is 192.168.1.1 and we don't want a conflict resulting into a mess. Once you save the new IP address your router will automatically reboot.
7. Once your router is restarted you need to open the admin console again but this time you would need to use the new IP address that we have changed it to which is http://192.168.1.2 and again enter the same user name and password which is "admin" and you will see the admin console again.
8. Go t the option that says Wireless Settings and you would see the SSID field. Please change it to something more individual because that's the name you would see when you are looking for your WiFi network and please don't use any rude words as this can be seen by every one who lives near by :) Use some thing like "My home network" or something on those lines.
9. Change the country to Pakistan or where ever you live and rest of the settings can be left to whatever the default is.
10. Now go to the Wireless security option to make sure no unauthorized people are able to access your WiFi network. Choose wpa-psk option as it is reasonably secured unless some hacking top shot lives near by you are pretty safe using this option. You can choose the encryption option TKIP or AES.
11.Enter the PSK pass phrase that you can remember and try using alphabets and numbers to make sure people are not able to guess it. It is generally safer to choose a non dictionary set of alphabets that make no sense.
12. Go to DHCP option and click on disable.
13. Your Router is ready to use, now just plug the Ethernet with modem.
14. Save everything and now go to Tools and click on reboot. This will restart your modem using the new settings that we have saved in all the above stept.
15. Your router is now all set and all you need to do is connect the router with the modem using an Ethernet cable. You can now take out the cable that connects to router with your computer and use the wifi network that we have created to use the internet.